
You don’t need a lab for these science experiments for kids. You already have most of the items needed to do these at home.

Introducing children to the wonders of science is a great way to ignite their curiosity and inspire a lifelong passion for discovery. Science experiments are more than just fun and entertaining, they are a hands-on learning time to explore the natural world, understand fundamental concepts and develop critical thinking skills.
The concepts you are able to teach children through simple science experiments are endless. Air pressure, surface tension, exothermic reactions or chemical reaction, static electricity and so much more can be taught with a few simple ingredients like baking soda, water and food colouring.
These science experiments for kids are super fast and easy
Science doesn’t have to stay in the classroom. It’s in many different places, from your backyard to your tummy, and even in things you can’t see. You can make things fun and interactive for your kids to help their mind expand and see the interconnectivity in the world around them.
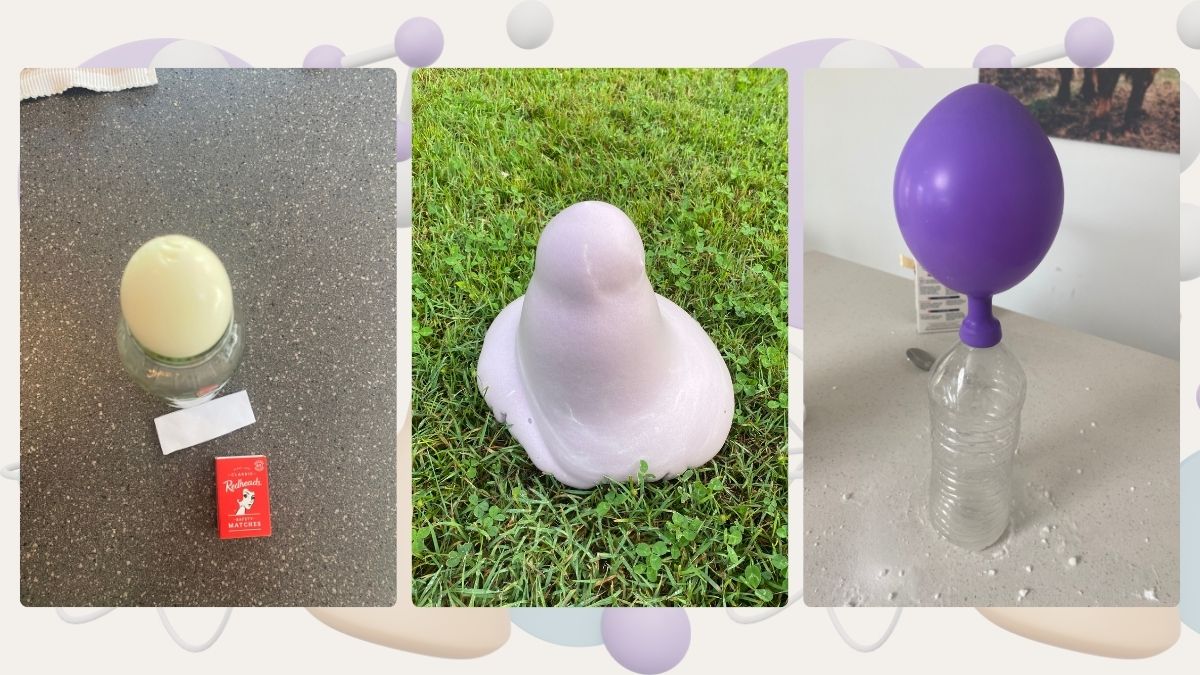
1. Egg in the bottle
Note to parents: This experiment requires fire. Make sure kids are taught never to play with fire. Keep a fire extinguisher nearby in case of emergency.
This is a great science experiment to demonstrate the power of air pressure. The egg appears to be sucked into the bottle, however it’s not being sucked at all. It’s a matter of high pressure overcoming low pressure.
Initially, the air pressure inside and outside the bottle is equal, preventing the egg from moving. When the paper burns inside the bottle, it heats the air, raising the temperature and, consequently, the pressure. Placing the egg on the bottle top creates a partial seal, allowing the high pressure to force air out of the bottle.
Once the burning paper depletes the oxygen, the flame extinguishes, causing the temperature and the pressure inside the bottle to drop. Suddenly, the outside air pressure is higher than the inside pressure, and pop! The egg is pushed into the bottle by the higher external pressure, perfectly illustrating the principle that high pressure always wins over low pressure.
The scientific explanation: Air pressure behaviour is explained by the Ideal Gas Law: PV=nRT or Pressure Volume = number of moles R (gas constant) * Temperature. This means in a fixed environment like a bottle, when the temperature rises, the pressure increases as well.
Materials:
- Glass bottle with a mouth smaller than the egg
- A4 paper cut into 4cm-wide strips
- Matches or lighter
- Hard boiled egg, peeled
Method:
- Set the bottle on a flat surface. Fold a strip of paper in half and light an end of the paper.
- Once the paper catches alight, place it flame down into the bottle and immediately place the egg on top. The egg will almost instantly be sucked into the bottle.
2. Elephant toothpaste
Note to parents: This experiment requires hydrogen peroxide which can irritate eyes and skin. Use safety goggles and gloves when handling. The liquid may be boiling hot after the explosion so do not touch until it has cooled down. It’s best to do this experiment outside.
The best science experiments for kids usually involve some kind of explosion. Elephant toothpaste is just that—a very fun science experiment with a dramatic but controlled explosion.
Don’t worry, the explosion is just good old regular foam. The foam produced is just water, soap and oxygen, so it’s fine to clean up and pour the rest down the drain. The colour mixing through the bottle is also pretty spectacular; the key is to use a lot of food colouring. The way different liquids interact with each other can be a great lesson on science but also visually striking.
The scientific explanation: The foam bubbles are filled with oxygen. The yeast acts as a catalyst, which speeds up the reaction caused by the breakdown of oxygen from the hydrogen peroxide. Because it all happens so fast, it creates lots and lots of bubbles. It also makes an exothermic reaction, meaning it creates heat.
Materials:
- Safety goggles & gloves
- Glass bottle
- 1 cup (250ml) hydrogen peroxide 6% (available from a chemist)
- Food colouring
- Liquid dish soap
- Glass bowl
- Dry active yeast
- 4 tablespoons of very warm water
Method:
- Put on goggles and gloves.
- Pour the hydrogen peroxide into the glass bottle.
- Add 30 drops of food colouring and the dish soap. The coloured water will look very dark, but it comes out much lighter.
- In another bowl, add yeast and warm water. Mix well until it looks like melted ice-cream.
- Add the yeast mixture to the bottle and the explosion will begin.
3. Self-inflating balloon
Can you make a balloon inflate without blowing it up? This is another fun experiment that teaches kids about chemical reactions. Make sure to have extra supplies as the kids will want to do it again.
The scientific explanation: When vinegar and baking soda mix, they undergo an acid-base reaction that produces carbon dioxide gas. This gas causes the balloon to inflate, demonstrating the chemical reaction in a visually exciting way.
Materials:
- 1 litre plastic bottle
- 4 teaspoons baking soda
- Funnel or teaspoon
- 12 tablespoons vinegar
- latex balloon
Method:
- Add baking soda to the bottle.
- Using a funnel or a teaspoon, pour vinegar into the balloon.
- Carefully stretch the open end of the balloon over the mouth of the bottle, ensuring the vinegar doesn’t spill out.
- Hold the balloon securely at the bottle’s neck. Lift the rest of the balloon to pour the vinegar into the bottle while maintaining your grip on the seal. As the vinegar mixes with the baking soda, a bubbling reaction will occur, producing carbon dioxide gas that inflates the balloon.
Teaching kids the scientific method
As your children’s interest is piqued, you can talk to them further about the scientific method. This will help to extend their learning from the science activities you have just done together. Here’s a simple breakdown of the steps involved:
- Ask a question: The process begins with a curious mind. Encourage kids to ask questions about the world around them. For example, “What happens to plants if they don’t get sunlight?”
- Do background research: Before jumping into an experiment, it’s helpful to learn more about the topic. Kids can read books, watch videos or ask an adult to gather information.
- Form a hypothesis: A hypothesis is an educated guess or prediction that answers the question. It should be something that can be tested. For example, “If a plant doesn’t get sunlight, it will not grow.”
- Conduct an experiment: Design an experiment to test the hypothesis. This involves creating a fair test by changing only one variable at a time while keeping all other conditions the same. For instance, have two plants: one in sunlight and one in darkness.
- Observe and record data: During the experiment, observe what happens and record the results. Kids can take notes, draw pictures or use charts to keep track of their observations.
- Analyse the data: Look at the data collected to see if it supports the hypothesis. This might involve comparing the growth of the plant in sunlight to the one in darkness.
- Draw a conclusion: Based on the analysis, determine whether the hypothesis was correct. For example, if the plant in darkness didn’t grow, the hypothesis is supported.
- Communicate results: Sharing what was learned is an important part of science. Kids can present their findings through a report, a poster or even a presentation to family or classmates.
What next?
- 3 science-based activities to entertain the kids at home
- Oobleck recipe: The Dr Seuss science experiment
- 13 craft ideas for kids, made from everyday materials
